Chocolate Snowflake Cake
Allergy Friendly + Gluten Free + Vegan
 Makes:
1 3 layer, 8 inch chocolate snowflake cake
 Prep Time:
45 minutes + 45 minutes assembly time
 Cook Time:
30 minutes
 Difficulty:
Medium
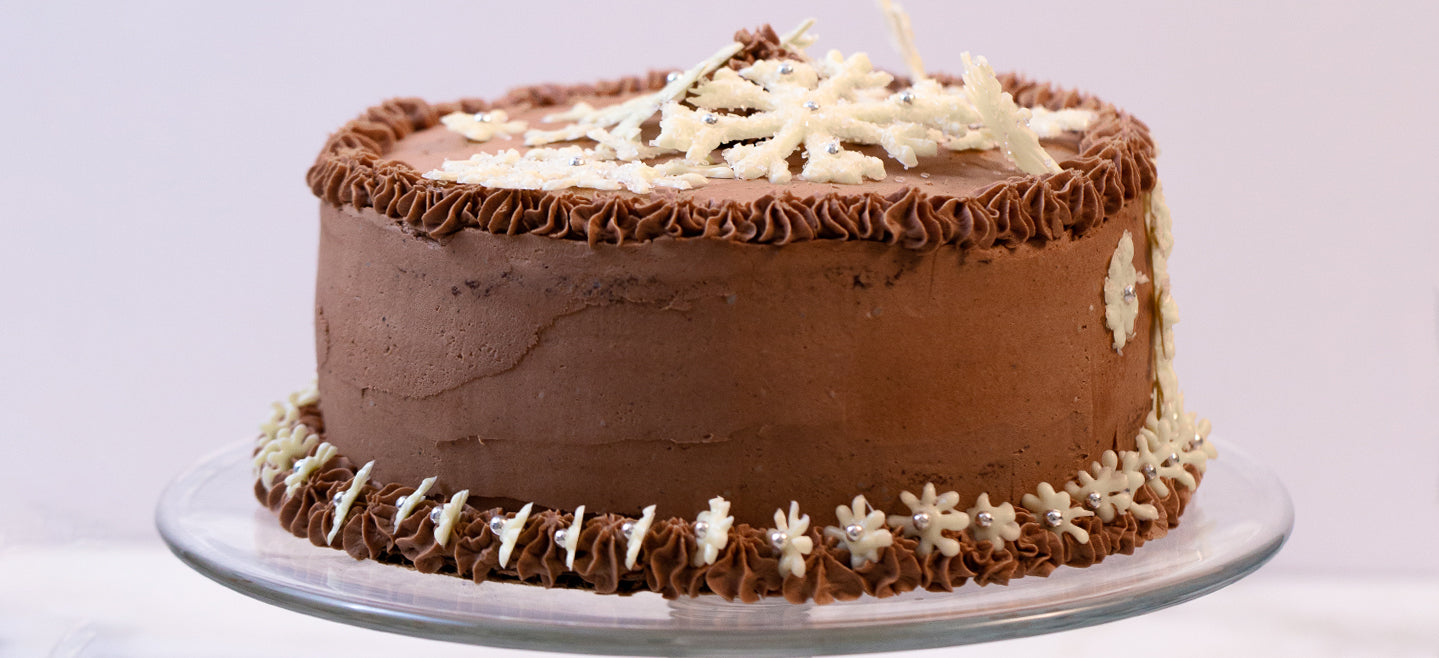

A snowy, show-stopping three-tier cake for any winter occasion!
In This Recipe

Ingredients
For the Cake
Hungry Harry's Chocolate Cake Mix (2 x 17 oz package)
4 eggs, or egg replacers
2 cups milk of choice
1 cup oil of choice (note: if using an oil that's solid at cool temperatures,
like coconut oil, melt the oil before beginning this recipe)
2 teaspoon gluten-free vanilla extract
1 cup allergy friendly white chocolate chips or chopped white chocolate bar, for the snowflake decorations.
For the Frosting
1/2 cup unrefined coconut oil
7 cups of confectioners sugar (two 16 oz bags)
4 teaspoons milk of choice
2 teaspoons gluten-free vanilla extract
1/2 cup cocoa powder
How To:
1. Begin by making the cake. Preheat your oven to 360°F. Grease three 8 inch cake pans with your preferred oil. If you only have one cake pan, bake in batches.
2. Sift the two Chocolate Cake mixes into a large bowl. Add eggs, milk, oil, and vanilla. Mix well until combined.
3. Divide the cake batter evenly into your three prepared cake pans.
4. Bake for 20-25 minutes, or until a toothpick inserted into the center comes out clean.
5. Cool completely (refrigeration helps) before removing from the cake pan.
6. Once the cake is cool, gently run a table knife along the outer edge of the pan, then place your hand on top of the cake and flip the pan to release the cake cleanly.
7. While the cake is cooling, make the frosting. With a stand mixer or hand mixer, beat the coconut oil until light, fluffy, and smooth.
8. With your mixer on low, slowly add the vanilla, a quarter of the confectioners sugar, and a quarter of the milk. Continue to add the confectioners sugar and milk in small batches. Add all of the cocoa powder and remaining milk last.
9. Beat until completely smooth and lump-free.
10. Fill a piping bag with the frosting. A gallon-size plastic storage bag with the corner snipped off can work as a substitute if you don't have a piping bag on hand.
11. To assemble, begin by carefully slicing off the top "dome" of each cooled cake. You want an even, flat surface. (Reserve these "domes" to snack on, or make cake pops!)
12. Choose which cake layer will be on the bottom, and place it on a flat plate, cardboard cake round, or stiff surface. This cake will be difficult to move once it's complete, so you want it on something that can easily slide back and forth.
13. Using your piping bag, work from the inside out in a spiral pattern to pipe the frosting on top of the first cake layer.
14. Layer the second cake on top of the icing, then ice the top of this layer in the same way as the first.
15. Flip the third and final cake layer upside down and set it on top of the other two. This ensures you have a smooth, flat top to your cake. Frost the top of this layer.
16. Using a large offset spatula, smooth the top of the cake frosting, and then the sides. Pipe more frosting on the sides of the cake as needed, and smooth with the spatula. Cover the entire cake with frosting as evenly as possible until no cake is showing.
17. To create the edible white chocolate snowflake decorations, draw or print out a snowflake pattern on a piece of parchment paper with a heavy pencil or marker.
18. Melt the white chocolate in the microwave, stirring frequently until it is smooth. Fill another piping bag fitted with a thin tip with the chocolate.
19. Flip the parchment paper over on a baking sheet, so your drawing is on the bottom. Then trace the pattern using the piping bag. Take your time, and don't worry if it's not perfect.
20. Place the baking sheet in the refrigerator to allow the chocolate snowflakes to cool and harden. Then, carefully pull them away from the parchment paper.
21. Decorate the finished cake with the snowflakes. Add a tiny dot of piped chocolate or frosting, then gently press each snowflake until it stays in place. Add a dusting of confectioners sugar for a snow effect, or add frosted rosettes or stars. You're ready to serve your masterpiece!